Saturday 27 April 2013

Testing a Method for Creating Plants

I was thinking of how I could get some models for plants without having really complex meshes as I didn't want to spend too much time on them, I though back to seeing how in some old games they would have a flat texture of a plant that would repeat and rotate to give it a sort of 3D effect. I had a think of how I could get a similar effect on maya, straight away I thought of using a flat plane with a transparent .png texture of a plant, I gave it a try by drawing a really quick desert plant texture on photoshop and saving it as .png.


I applied the texture to a flat square plane on maya and it seems to have worked, although the shading looks really bad at the moment so I might need to play with some shaders to find one that looks good, I'm undecided as to whether I will use the version with a repeated rotated texture or just one flat texture.
obviously either way I'll have to draw a better texture first.


Horse Texture Test

 I mentioned that I had created a mesh for a dead horse, I said that I wasn't sure whether I liked it or not.

Today I unwrapped the UV for the main parts of the horse so that I could draw a test texture to just see what it would actually look like, I actually like the result quite a lot so I'm going to keep it I think.


Friday 26 April 2013

managing UVs

Today while mapping the UVs for the coffin asset I discovered the importance of organising the UVs in the UV Texture Editor.

First thing I did was made the UVs so that the faces on the sides of the coffin were attached to the top of the lid so that the UVs blended down into the sides, but as a result the UVs weren't blending around the sides.


 After finishing the UV unwrapping I decided to try it again using different organisation. I decided that it was probably more important for the faces on the sides of the coffin to blend into each other than into the top of the coffin so I mapped them out flat together instead.


(I didn't bother mapping the cross as I'm just going to use a solid dark colour for it anyway.)


model update

Rather than keeping my draft model as I found it to be really boring and everything was straight so there wasn't really any composition or character I created a new model from scratch using the same basic idea.

Before I started I created a very basic sketch of the composition, and I wanted some kind of implication of a story in there so I included a coffin makers shop and a Lawyer/Doctor office juxtaposed with each other to create some contrast, I didn't put too much thought into a story or anything it's just there to make things a little more interesting, and I may use more rich colours for the lawyer/doctor office and more drab greys and browns for the coffin makers shop again to create some contrast and make the environment a little more interesting.


I'm not sure that the ground is final yet I don't really like the way it looks although the depth of the terrain will be kind of the same either way.

The buildings aren't finished yet, I still need to add doors and windows but I'm waiting to find some good reference for them before I start and I am going to create them as separate assets to make it easier to unwrap the UVs and paint textures.


I mentioned that I was disappointed with how small the cow skull was going to be considering how long it took me to unwrap the UVs and I was always going to use one to have as a decoration on a building so I decided just to make it really big to serve as part of the sign on the coffin shop, as well as that I will paint a sign on there with the textures.


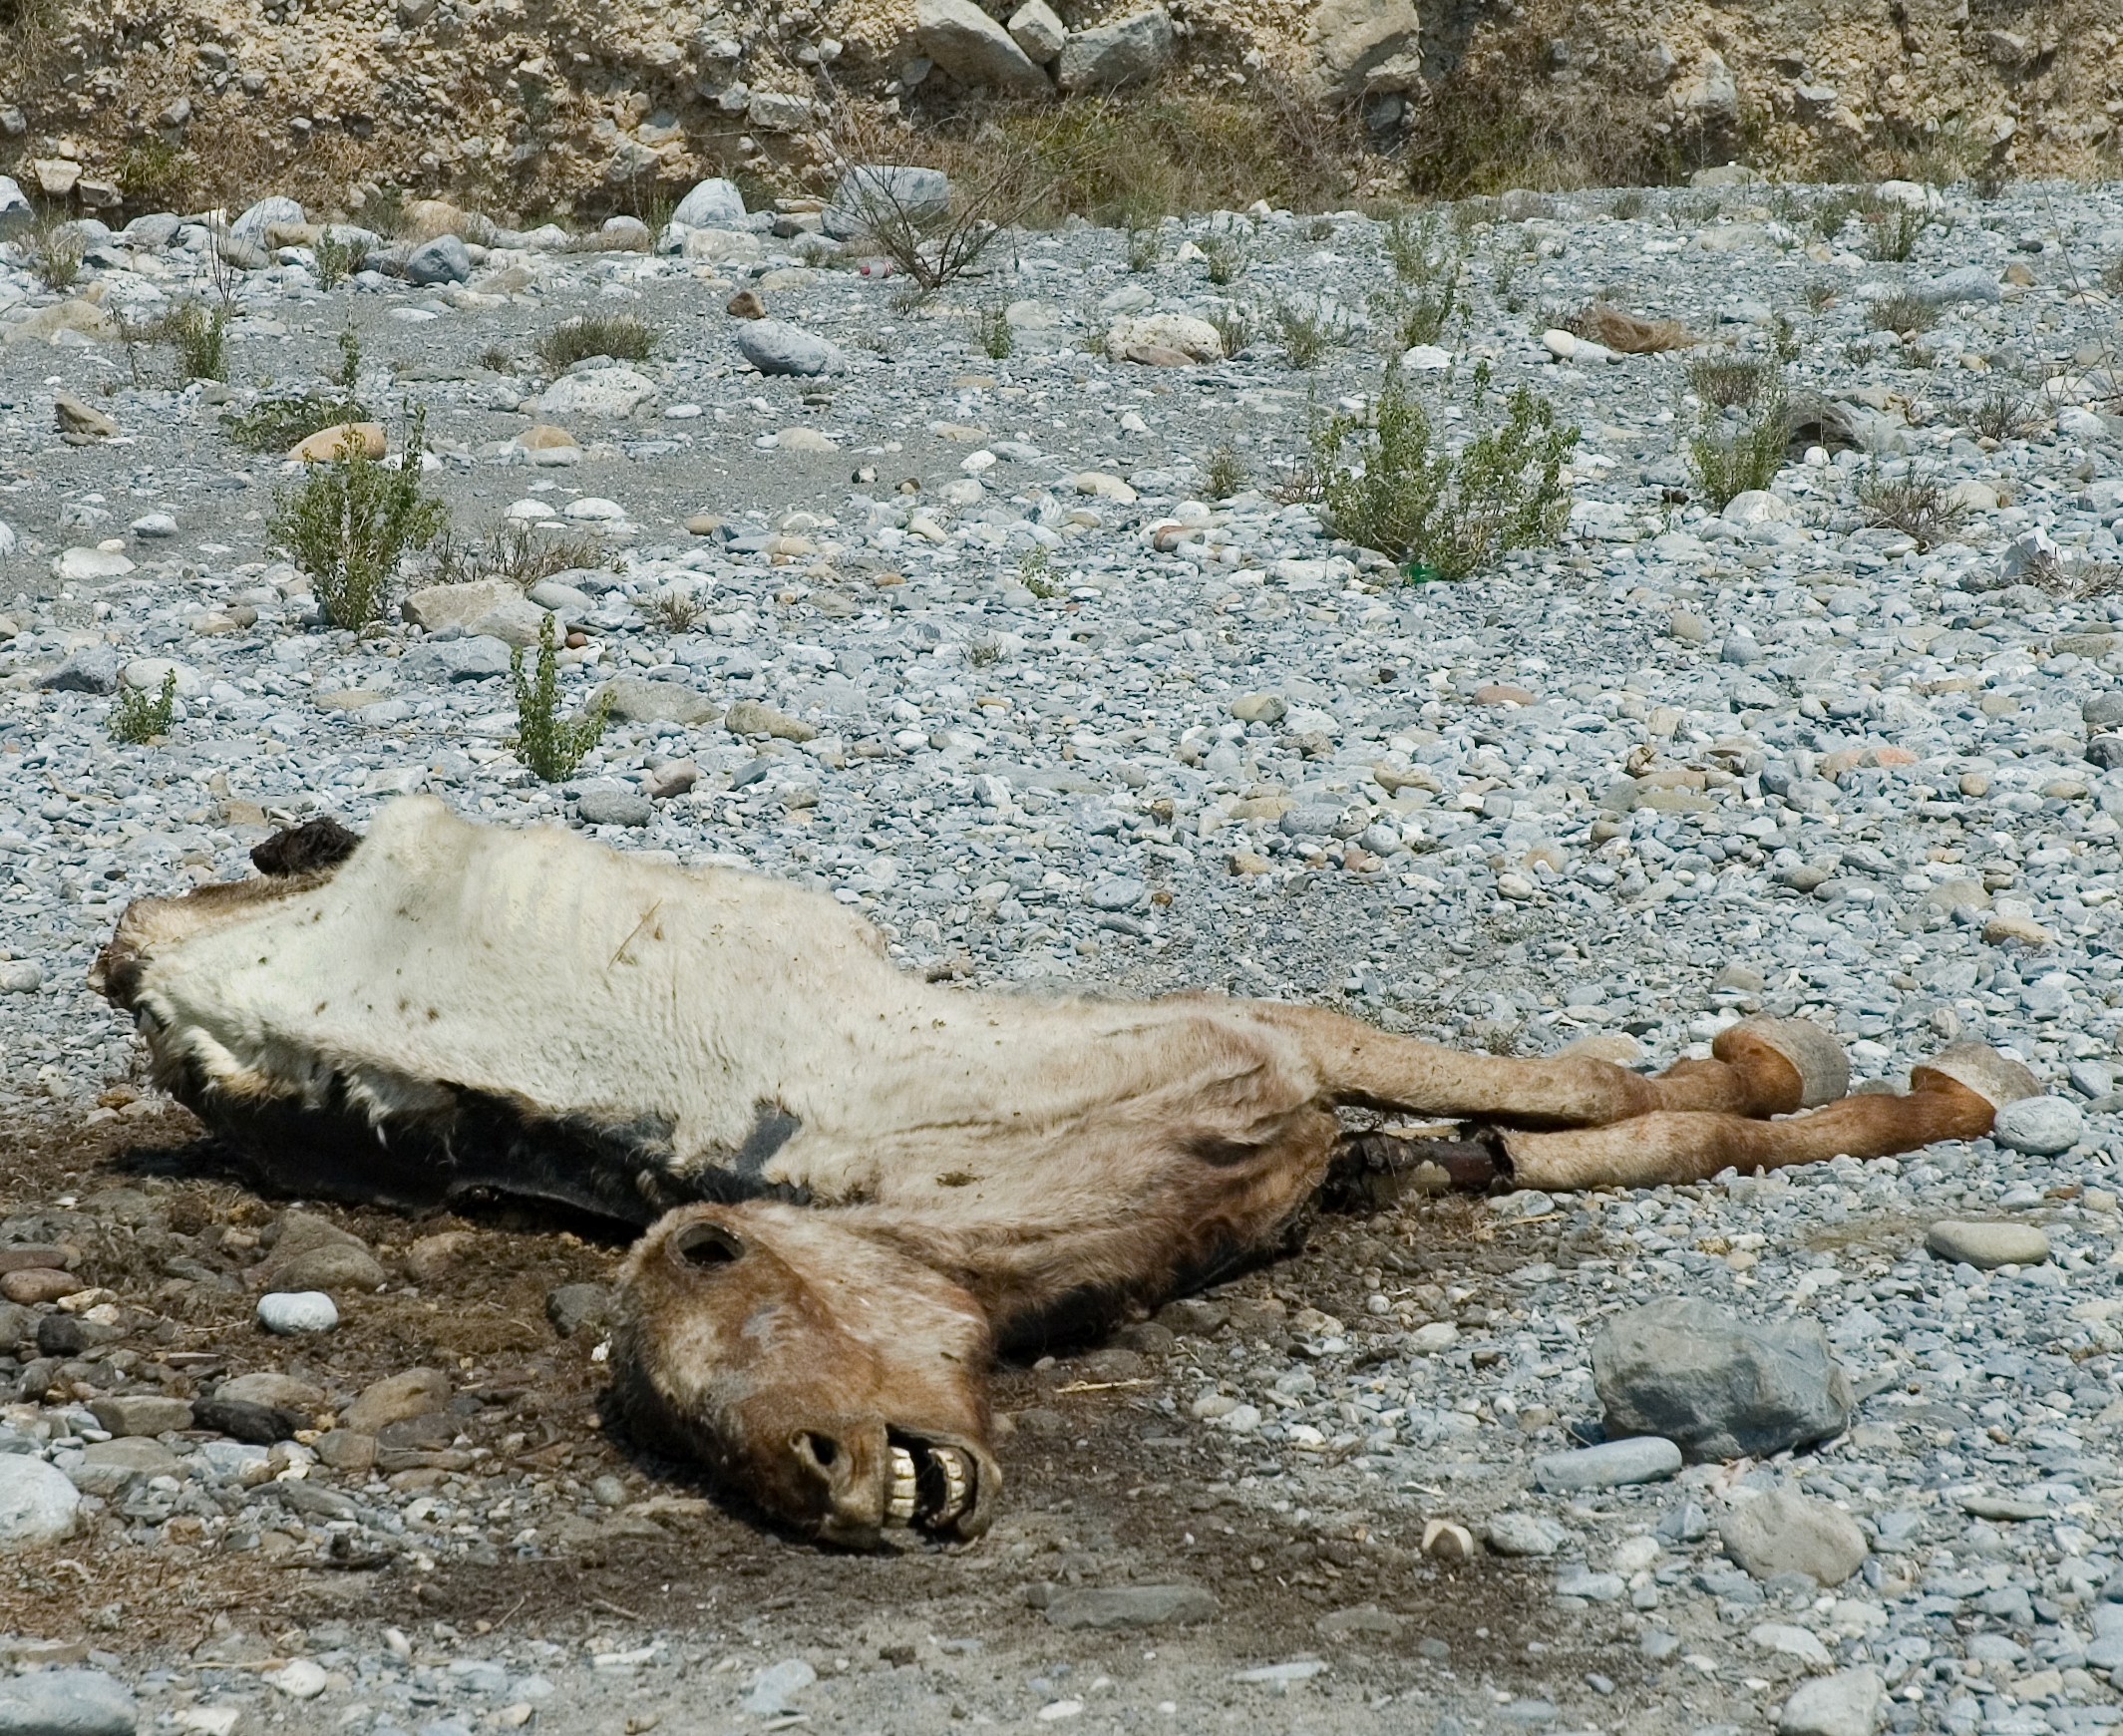
I added this dead and decaying horse to the ground to add some variation and give a bit more life and character to the environment, I may or may not keep it, but I want to know what it looks like when textured before I can make a decision, I don't really like it as it is but I think it could look quite good with textures. 


Some References

 http://iloapp.bytelab.co.uk/blog/outofoffice?ShowFile&image=1279910870.jpg
https://blogger.googleusercontent.com/img/b/R29vZ2xl/AVvXsEhHEAaNWYL8jbX-Mn7hDTHHIsyAT95jJGOqAlqrAwK5UdGyhY9HS_PWF8mTFOdgtHqyIHu2RMKTfoKDVR6SgcrOcm949d8BgmoIb-0KTzVJCc9XfQxzhGk4oh22-G36lO_BWfLVf6xP_sI/s1600/modwest01.jpg
http://www.brickshow.com/wp-content/uploads/2011/12/mdular-western-town2.jpg

I used the last two reference images of lego western towns because I thought that they would be helpful considering my low poly approach and simply textures with saturated colours.

(I haven't added them yet but the mine cart rail will be added to into the top left of the composition (using the birds eye view posted here as reference)

Wednesday 24 April 2013

Cow Skull cont.

After finishing my mine cart track I found some new confidence and techniques in unwrapping UVs so I wanted to give the skull another go. I kind of feel like I am putting a little bit too much time into the skull considering it will be such a small asset and is relatively high poly compared to everything else. I think it is worth it though because I am getting great practice, particularly with the new method of unwrapping the UVs that I had discovered while playing around with the tracks.


There are two discoveries that I found really really useful when it comes to unwrapping the UVs and they are both elements of the projecting UVs, before where I would get stuck is that I would just project the UV in X, Y or Z and then try and make up for the skewness incorrect proportions in the UV Texture Editor manually. But yesterday I realised that you can actually go straight ahead and edit the projection after you project to X Y and Z within Maya's interface and it was so much easier doing it this way, this method was my savoir because I instantly felt 10x more comfortable unwrapping the UVs. The next thing I found out was that you can edit the projection width and height in the Attribute Editor, one of the problems that I was having was that all of my planes had different size UVs and I was trying my best to manually resize them in the UV Texture Editor, but with the Attribute Editor you can just give the height and width an equal value and your UVs will be in proportion, and since you can just keep using the same values over and over it makes it a lot easier fitting together the pieces later on as you don't need to resize anything, most planes fit perfectly together in the UV Texture Editor straight away.

I encountered a problem when I was unwrapping the UVs of the rails before, I unwrapped everything using the aforementioned method, but I left putting the pieces together right to the end, as I said it took a long time just figuring out what went where, but with the cow skull so far I have just been putting things in place as soon as I project the UV making it a lot easier, I won't have to try and figure out where everything goes at the end because I'm just getting it out of the way as I go.


Here is how the cow skull is going so far, it looks a lot better already I think, before each plane had a UV of all different sizes and they were stretched and skewed all over the place, but they fit almost perfectly now other than a few slightly stretched areas that I don't think are that noticeable. I foresee some difficulty in unwrapping the eye sockets, as I just feel like I will be difficult to get the UVs to flow without stretch or overlap, but I'll cross that bridge when I come to it.

Rail tracks model and UV mapping finished.

I decided that before I start trying to unwrap the UVs for my buildings in my town model (I may just use the draft model and add to it or I might create a new model. I haven't yet decided but I think making a new model will only take about 3 hours at most so I'm not afraid about time limits; I will be keeping the model simple and low poly.) that I would continue with something easy to give myself a bit of practice with unwrapping UVs, I made the mistake last time of thinking that the cow skull would be an easy thing to practice on but it was actually a lot more complicated than I was expecting, this time around I just started with the rail tracks as it mostly consists of modified cuboids.


I was successful and managed to unwrap all of my UVs in a few hours, the rails actually took a lot longer than I was expecting because they consist of lots of long rectangles and finding which one went where was much more of a problem than I was expecting.

I had considered changing the logs that I used for the tracks before for rectangular planks but I thought that the details in the planks would make it harder to unwrap the UVs, after finished unwrapping the rails I realised that actually rectangular planks would probably be a lot easier to unwrap and in total creating the mesh for them and unwrapping ended up taking no longer than 25 minutes so I was glad that I decided to change them, they look a lot nicer than the logs and because of the nature of the planks weathering shapes, I decided that I could get away with using just one plank model repeated where with the logs I was using about 3 or 4 separate log models.

I had already given the rails themselves some form and twisting shape to give them character and give more of an element of 'terrain' to my level rather than just having a flat boring ground, but with the planks I also wanted to give them some signs of age and use, I used the split polygon tool to create some grooves in the wood in a style that I thought was characteristic to wood. I wanted to keep the model itself simple so I just stuck to the split polygon tool and I think that it was sufficient. after that when placing the planks on the rails I  made them uneven and wonky with uneven space between each plank; I wanted to give the impression of an old mine cart track that had never really been taken care of but had been used over the years, this was to keep up with the setting and create and atmosphere using the assets.


Monday 22 April 2013

Cow Skull UV mapping


As I mentioned I was having some trouble with mapping the UVs for the cow skull, each face doesn't seem to match and there are parts that are stretching, I had difficulty especially on the end of the nose area where I really couldn't get the UV to match at all.

Reference images and draft model of town.

I used the internet to find some reference photographs of american towns in the late 19th century
 - early 20th century in the west and some photographs from the same period of just landscapes and smaller details like rail tracks for inspiration for how to give the ground some 3D form and character.


After finding enough reference images I proceeded to create a draft model of the town that I would use for the final model just to essentially use like a sketch. I tried to keep it simple and not have too much going on. I've been getting more confident with 3D modelling but I am now having trouble with UV mapping, so I want to try and keep it simple ,I was having trouble before with my Cow Skull which I wanted to map some textures to for practise but it ended up being more difficult than I was expecting.


I also created a separate asset to include into my town along with the skull to give the town more character, I may create another simple asset to give more variety.


Monday 8 April 2013

Cow Skull v2

I had another go at modelling a cows skull trying to stay as low poly as I could while still representing the form of the skull, I had in mind that there were certain details that I wouldn't necessarily need to include since I could imply form using normal mapping and texture mapping, I also used a mirroring technique this time around, but creating a box and creating a 'duplicate special' with 'Keep faces together' switched on. after finishing the model it's possible that I would remove the duplicate and 'mirror geometry'  that would also allow me to create some asymmetry  although that may not be necessary in a simple asset and I might be better off keeping it symmetrical so I can just use the same texture map on each side, although I will have to look up how to do that.


I'm a lot happier with this model than my last attempt, I think I stuck closer to the reference and succeeded in creating a much closer likeness to an actual cow skull, using the duplicate special mirroring technique helped with that a lot because I could focus on just getting everything to look right instead of be worried about trying to make everything symmetrical myself.


Minor Edit:
Fixed the eye sockets.

Thursday 4 April 2013

Cow Skull

To warm up for the next project I decided to create a simple asset and attempt to model and texture it as practice and to try and see where I need to improve before I start the real thing, I decided that a cow skull would be a balance of kind of easy but satisfying to look at once it's finished, so I went to google to find a few reference images to use of different angles of cow skulls.


http://www.crafts-gifts.com/cow-skulls/cow-skulls-38.jpg

http://www.cowskull.com/images/cow_skulls.jpg


Using these images as reference I attempted to model a cow skull, it was going fairly well, I almost fully modelled one side of the skull, and when I moved on to start on the other side I started getting problems being unable to create lines and faces, after some experimentation I just decided to call this one a failed experiment.


In my next attempt I may decide to try modelling something easier like a hitching post or something similar, or I might try and see if I can find out how to model using mirroring so I only have to model one side of the skull, either way I think I need to try and use less polys as it will just be a small asset and I will need to map the UV.

Western Town

For the next project which involves modelling and texturing a small game map to be imported to a game engine I had a think of some themes I would be interested in working with, quickly I decided that I would like to create a kind of  19th century American Western town.


Once I decided on my theme I started sketching some ideas of the kinds of things you might expect to see in such an environment and start working on the general aesthetic of the town, I also decided that I want to go with stylised saturated textures like those you might find in Borderlands.